Environments
To start using an execution environment, you need to:
- Add the execution environment in the Controller
- Install an agent
- Launch your agent
- Configure your agent
Add an Execution Environment
Before you install and configure an agent to run your tests, you must add an execution environment. This process generates a unique access key (.ini file) that you’ll need to complete your agent setup.
To set up an execution environment, follow these steps:
-
Log in to Eggplant DAI.
-
Go to Controller > Environments. The Environments page opens showing a list of existing execution environments and their status.
-
Click Add New +.
-
In the Name box, enter a unique name for the execution environment with no spaces.
noteThe agent can run on the same machine as the Eggplant DAI server, or any local or hosted machine that can connect to the Eggplant DAI server via the network.
-
(Optional) Enter the full path to access the .CSV files for using with code snippets in the suite. For example, for a .CSV file located on your desktop, enter
C:\Users\Eggy\Desktop\. -
Click Save.
-
When the Agent access key dialog box appears, click Download and store the
.inifile in a secure location. The details of the new execution environment then appears on the Environments page. -
Continue to the next section.
Install an Agent
The agent is available as a Windows .exe file, a Mac app, and Linux binaries for CentOS/Red Hat and Ubuntu/Debian. The following OS versions are supported:
- Windows: 64-bit Windows 7 and 10, Windows Server 2012, 2016, 2019
- macOS: macOS 10.12, 10.13, 10.14, 10.15 (Note: Big Sur is not currently supported)
- Linux: RedHat 7, CentOS 7, Ubuntu 16 (64-bit)
- On the Environments page, click Agent Tools.
- From the Agent Installer list, select the platform that you use.
- Select Download to save the installation file to your Downloads folder.
- Open your Downloads folder and use the following platform-specific instructions.
For Windows
Double-click eggplantAIagent.exe and follow the prompts to complete the installation.
For macOS
- Double-click
eggplantAIagent.dmg. - Drag
eggplantAIagent.appinto your Applications folder.
For Linux
The steps for extracting and running the agent are the same across different Linux platforms, although the name of the archive file may differ.
-
Either manually extract
eggplantAIagent-CentOS-RedHat.tar.gzoreggplantAIagent-Ubuntu-Debian.tar.gzto your preferred directory, or use the following script.cd $HOMEmkdir eggplanttar -xzf eggplantAIagent-CentOS-4.2.0.tar.gz -C "$HOME/eggplant" -
(Optional) To run
eggplantAIagentdirectly from the command line, addexport PATH="$PATH:$HOME/eggplant"to your.bashrcor.zshrcfile, or use the following commands:cd $HOME/eggplant./eggplantAIagent
Launch Your Agent
You can launch the Eggplant DAI Agent from the Start menu on Windows or from the Applications folder on a Mac. You can also run the agent from the command line without a UI. In all cases, the Eggplant DAI Agent is launched ready for you to complete your setup.
For Windows
Open eggplantAiagent from the Start menu.
For macOS
Launch the eggplantAiagent from the Applications folder.
For Linux
Launch your Eggplant DAI Agent from the terminal.
-
Open a command prompt.
-
Find the directory where you extracted the
.tar.gzfile, e.g.:cd $HOME/eggplant -
Enter the following command to run the agent:
./eggplantAIagent
Configure Your Agent
To log in and start using your agent, you must:
- Add your agent access key
- Enter your connection details and preferences.
Add Your Agent Access Key
- On the eggplant DAI agent dialog box, select Add New and browse to the access key (
.inifile) that you downloaded in Add an Execution Environment or Regenerate Access Key. - Click Open. The Execution Environment box shows the name and URL of the execution environment that you created and the details are automatically added to an environment settings file on your computer.
- Click Login to authenticate with your Eggplant DAI environment. A new Eggplant DAI Agent dialog box appears as soon as your access key is verified.
- Delete the access key from your computer.
Enter Your Connection Details
-
From the Execution environment mode options, select either:
- Design: To execute tests in the Modeler and Designer (Capture and Live Run). You must use this option if you're authoring in a hosted cloud SUT environment, i.e. the Cloud... button in Eggplant Functional's Connection List is only available in the Design mode.
- Run: To execute scheduled and immediate test configuration runs from the Eggplant DAI Runner page.
-
Update the default value in the Eggplant Functional drive executable box if the
eggplant.batis stored in a different place on your system. -
If necessary, update the default value in the Port box.
-
Clear the Start Eggplant Functional GUI checkbox if you want to either:
-
Run Eggplant Functional in drive mode
-
Use Run execution mode for running several tests on the execution environment. Continuous opening and closing of SUT connections may cause problems with Eggplant Functional.
noteTo improve reliability in Run mode, make sure that initial state of the SUT is verified in your SenseTalk scripts before moving on to subsequent steps.
-
-
Select the Extra debug messages checkbox to display more detailed messages in the Log output pane.
-
In the Suites pane, click Choose to browse and select the folder on your system that contains your Eggplant Functional suites and SenseTalk code snippets. See Manage Suites to learn how to upload and download subfolders in this directory.
-
Click Start to launch the agent. Both the agent and Eggplant Functional launch automatically.
Click Stop to close the agent or Logout to go back to the Agent Login screen to connect to a different server.
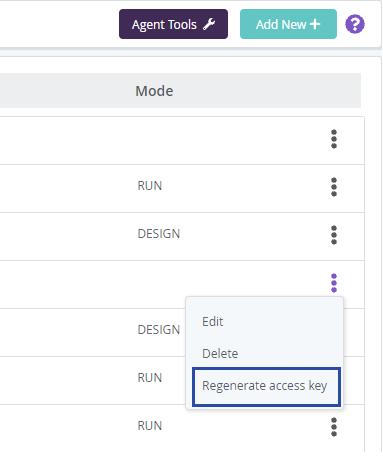
Regenerate an Access Key
If you want to use execution environments that were created before upgrading to Eggplant DAI 6.0, you'll need to regenerate an access key for each one and add the key to your agent. Also follow these instructions if you've regenerated your access key for security reasons.
-
Log in to Eggplant DAI.
-
Go to Controller > Environments. The Environments page shows a list of the existing execution environments and their status.
-
Click on the actions menu of the execution environment that you're interested in and select Regenerate access key:
-
When the dialog box appears, click Regenerate and then Download. Store the
.inifile in a secure location. -
Follow the instructions in Add Your Agent Access Key to setup your agent with the new key.